Windows Source Installation
The following steps are how to install from source codes. If you wanna using prebuilt DLL, please see Windows EXE Installation .
1. Install Build Tools
1.1 Install Visual Studio
Download Visual Studio 2017 from https://visualstudio.microsoft.com/zh-hans/vs/older-downloads/ and install, select “Desktop development with C++” .
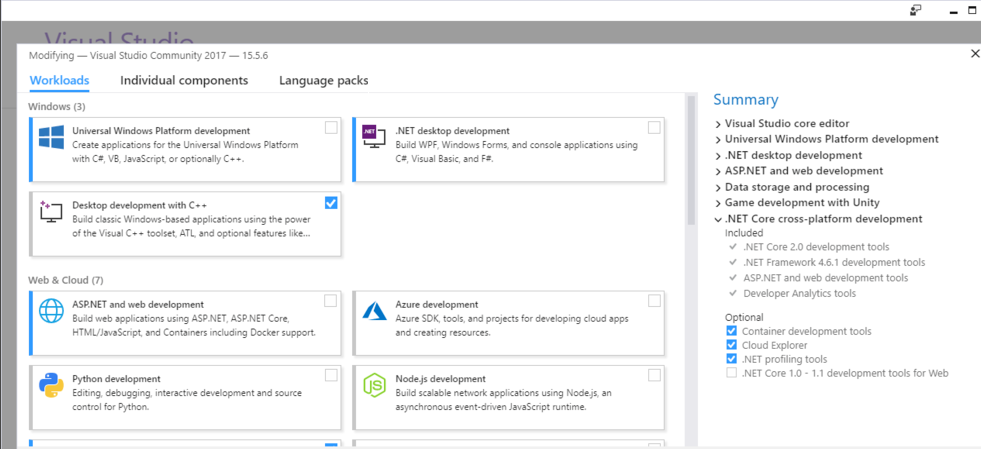
Tip
support Visual Studio 2015 and Visual Studio 2017.
1.2 Install CMake
Download CMake from https://cmake.org/ and install
1.3 Install MSYS2
Download MSYS2 from http://mirrors.ustc.edu.cn/msys2/distrib/x86_64/ and install
Add bin path to System PATH environment variable list (Add to the PATH on Windows 10)
C:\msys64\usr\bin
Install make , double click msys2.exe , input following command:
pacman -Syu
pacman -S make
Finally, the CMD (Command Prompt) can run the following command:
>make --version
GNU Make 4.2.1
2. Install SDK dependencies
2.1 Install OpenCV
2.1.1 Install OpenCV with Pre-built Libraries (Recommend)
*For more details you can reference OpenCV offical document *
Go to OpenCV Sourceforge page http://sourceforge.net/projects/opencvlibrary/files/opencv-win/
Choose a build you want to use and download it. For example 3.4.3/opencv-3.4.3-vc14_vc15.exe
Make sure you have admin rights. Unpack the self-extracting archive
To finalize the installation, go to set the OpenCV environment variable and add it to the systems path
2.1.2 Set up environment variable
Start up a command window as admin and enter following command to add
OPENCV_DIRenvironment variable:
Change the “D:OpenCV” to your opencv unpack path
setx -m OPENCV_DIR D:\OpenCV\Build\x64\vc14\lib     (suggested for Visual Studio 2015 - 64 bit Windows)
setx -m OPENCV_DIR D:\OpenCV\Build\x64\vc15\lib     (suggested for Visual Studio 2017 - 64 bit Windows)
Or referring to Add to the PATH on Windows 10
to add OPENCV_DIR environment variable manually.
D:\OpenCV\Build\x64\vc14\lib     (suggested for Visual Studio 2015 - 64 bit Windows)
D:\OpenCV\Build\x64\vc15\lib     (suggested for Visual Studio 2017 - 64 bit Windows)
Add OpenCV bin path to System PATH environment variable list
D:\OpenCV\Build\x64\vc14\bin     (suggested for Visual Studio 2015 - 64 bit Windows)
D:\OpenCV\Build\x64\vc15\bin     (suggested for Visual Studio 2017 - 64 bit Windows)
2.2 Install libjpeg-turbo
Download libjpeg-turbo from https://sourceforge.net/projects/libjpeg-turbo/files/ and install
Add bin path to System PATH environment variable list
C:\libjpeg-turbo64\bin
2.3 Install PCL for Point Cloud sample (Optional)
Download All-in-one installers (PCL + dependencies) from: https://github.com/PointCloudLibrary/pcl/releases
3. Build SDK
Open “x64 Native Tools Command Prompt for VS 2017”(suggested for Visual Studio 2017 - 64 bit Windows) command shell
git clone https://github.com/slightech/MYNT-EYE-D-SDK.git
cd MYNT-EYE-D-SDK
make all
Tip
Visual Studio Command Prompt can be opened from the Start menu,

You can also open it from the Visual Studio Tools menu.

However, if you do not have the Visual Studio 2015 Tools menu, you can add one yourself.
Open Tools’s External Tools… and Add the following:
Field |
Value |
|---|---|
Title |
Visual Studio Command Prompt |
Command |
|
Arguments |
|
Initial Directory |
|
4. Run Samples
Note: Open the rectified image by default (Run vio need to raw image, run depth or points cloud need to rectified image.)
get_image shows the left camera image and colorful depthmap (compatible with USB2.0)
.\samples\_output\bin\get_image.bat
get_stereo_image shows the left camera image and colorful depthmap
./samples/_output/bin/get_stereo_image.bat
get_depth shows the left camera image, 16UC1 depthmap and depth value(mm) on mouse pointed pixel
.\samples\_output\bin\get_depth.bat
get_points shows the left camera image, 16UC1 depthmap and point cloud view
.\samples\_output\bin\get_points.bat
get_imu shows motion datas
.\samples\_output\bin\get_imu
get_img_params show camera intrinsics and save in file
.\samples\_output\bin\get_img_params
get_imu_params show imu intrinsics and save in file
.\samples\_output\bin\get_imu_params
get_from_callbacks show image and imu data by callback
.\samples\_output\bin\get_from_callbacks
get_all_with_options open device with different options
.\samples\_output\bin\get_all_with_options
get_depth_with_filter display filtered depth image
.\samples\_output\bin\get_depth_with_filter
get_points_with_filter display filtered point cloud image
.\samples\_output\bin\get_points_with_filter
5. Clean
cd <sdk>  # local path of SDK
make cleanall